Sunday, July 30, 2023

Online Exclusives - Stampin With Friends Blog Hop


Hi - and thanks for joining me on our next "hop" with my Stampin With Friends friends.

This week, we are show-casing some of the products we have available as Online 
Exclusives.  This means you won't find the products in catalogues - you will only find them by visiting my online store - and they are gorgeous. 

This month we also have a special promo running, if you live in Australia and spend $90 on your shopping spree this month, you will receive a $9 credit voucher to spend in August when our new mini catalogue is released.  Check out my store and see what lovely things you can find.


This hop I have created a really simple card using 3 of our Online Exclusive Products:
* One Horse Open Sleigh 6" x 6" Designer Seriers Paper (DSP)
* Timeless Charm Cling Stamp Set
* Timeless Charm Dies
(The stamp set and dies can be purchased as a bundle at a reduced price)


I chose two pieces from the DSP pack and have used the "back" side of the paper.  
I cut the red sheet to 14.5 cm x 10 cm and the woodgrain piece to 14 cm x 9.5 cm.
To keep some continuity in the card, I thought I would use the Timeless Charm Dies to cut some cute little leaves from the red sheet to use as a feature on the front of the card.   


So this is my red DSP, with dies cut from the centre.  Now I like to be quite frugal with my supplies - you know, we all spend good money and don't want to be wasteful, so I made sure I left room around the die cuts so this piece could still be used on the card front.


Using my Stampin' Seal tape, I have attached the woodgrain to the red DSP and you would never even know that there were bits missing from the back piece.


These are some of the dies I cut from the red DSP and I played around with how they would sit best when attached to the card.  When I was happy with the configuration, I just used the Stampin' Seal again on the front then stuck the leaves in place.


I stamped the sentiment on a piece of  scrap white cardstock that measured 6cm x 3cm and attached a few more of the little leaves to the back with more tape.  I added some dimensionals to the back of the sentiment to pop it up from the card then put all the pieces together.


Add a few brushed metallic dots for a bit or sparkle and there you go.
How cute is this card.


Product List

Saturday, July 22, 2023

Colour Challenge - Ink Stamp Share Monthly Blog Hop


This time around I am hopping with the Ink Stamp Share group and they have challenged us to use the following colour combination.  For me, it could only mean florals, so I hope you love what I have created.


Berry Burst, Lemon Lolly and Bubble Bath - all scream pretty pansies to me.  Growing up and living in the beautiful "Garden City" of Toowoomba, I see these delightful little smiling faces in gardens everywhere across town, even in my own.  The reminded me of sitting outside in the garden with my nanna and all the laughs we used to have outside pulling weeds and catching grass hoppers.
I started with the Basic White Thick Cardstock for the base and simply cut the A4 sheet in half (approx 21 x 14.8 cm) and scored it at 10.5 cm along the long side.  Fold in half and use the bone folder for a crisp fold line.

I then cut a piece of the regular Basic White Cardstock 13.8 x 9.5cm and popped it in the Fern 3D Embossing Folder and ran it through the Stampin' Cut and Emboss Machine to add some texture to the card front then added a touch of Wink of Stella along the leaves to add a soft shimmer.


I used the Pansy Dies and cut out multiples of the pansy shapes in Lemon Lolly, Bubble Bath and Berry Burst so I had plenty of pieces to play and experiment with.  The leaves and stems were cut from the Granny Apple Green. I cut enough to make 2 pansies in each colour all from a 1/4 piece of the cardstock so I have lots left over to make more cards as well. 


This was my selection of colours for the first flower and I just reversed the colours for the second flower - soooo cute.  I ran the multipurpose glue along the outer edge of the flowers to adhere the highlights and sat them aside for a few seconds to dry, then just put all the pieces together to form the flowers ands leaves and buds.


And here is the end product of all those pieces.  I added a Brushed Metalic Adhesive Dot to the centre.


I attached the embossed piece with Stampin' Seal for extra strength and used multipurpose glue for the first flower, flower bus and leaves.  The second flower and the sentiment are popped up with Dimensionals.  The sentiment was stamped in Tuxedo on white cardstock and backed with a scrap piece of Granny Apple Green.
And here is the finished card:


Thanks for joining me on my hop.  If you would like to see some more beautiful cards for inspiration, please follow along on the Hop Carousel below, and visit some of my friends from all around the world.


Product List

If you reside in Australia and do not have a Stampin’ Up! demonstrator, don’t hesitate to get in touch with me at
creativejunction@bigpond.com
I would love to help you with your creative discoveries.
If you could kindly leave a comment, I would greatly appreciate it.
Cheers
Deb

Sunday, July 9, 2023

Colour Refresh - Stampin With Friends Blog Hop


It feels like such a long time since I "hopped" along with my friends, but here we go.  😀
 

Todays theme is COLOUR REFRESH.

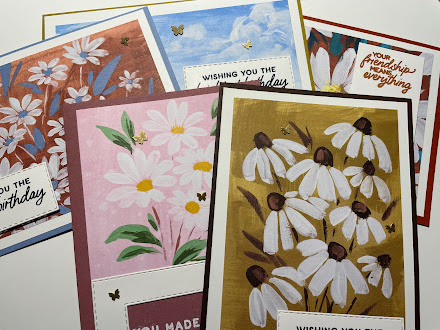
Our new catalogue is out and we have some gorgeous ne colours to play with.  This time, I've chosen to make some very simple cards using our new 2023- 2025 In Colour range.  It matches perfectly with the Fresh as a Daisy Designer Series Paper.


These 5 cards were created using half a sheet of the cardstock in each of the 5 new colours - Copper Clay, Wild Wheat, Boho Blue, Moody Mauve and Pebbled Path.  They are all very simple to make because the new DSP has a sheet of "fronts" designed to make card making fast and easy.


I would love to be making more complex and creative cards, but for a busy girl working 8am - 6pm, 7 days a week, just being able to spend an hour being creative is exactly the relaxation I need to switch off after a busy day.  If you are time poor like me, then this is the perfect way to do some fast cards.  😁

All I have done here is cut the cardstock in half (14.52 cm if you are cutting the long side or 10.5cm if you are cutting the short side).  Either way works really well depending on whether you want a card in portrait or landscape style.  Then I scored half way and folded using the bone folder to create a crisp edge.  It doesn't get much easier than that.

For each card I then chose a section from the DSP to match the base, cut it to a size I was happy with (some are mounted on white cardstock to make the colours pop a little more), added a simple sentiment on scraps of cardstock I keep on hand and then a little bling added for a final sparkle.  

5 simple cards created in less than an hour.


Product List

Wiper Technique

I've had a bit of a break from blogging while I was recovering from a bug, but I'm back today with the Stampin with Friends Crew - c...